
In this article, you will find a straightforward and detailed set of instructions on how to build your own outdoor pull-up bar for your home gym. Whether you’re an avid fitness enthusiast or just starting your fitness journey, having a pull-up bar in your backyard can provide a convenient and effective way to strengthen your upper body. With our step-by-step guide, you’ll have your very own DIY pull-up bar in no time, enabling you to achieve your fitness goals without ever having to leave the comfort of your own home. So, grab your tools and get ready to take your workout routine to the next level with this exciting and practical project.
Materials and Tools Needed
To build your own DIY outdoor pull-up bar, you will need a few materials and tools to get started. Here’s a list of the essentials:
List of materials:
- Lumber (2×4 or 4×4)
- Concrete mix
- Galvanized steel pipe or bar
- Screws or bolts
- Paint or varnish (optional)
- Grips or padding (optional)
List of tools:
- Tape measure
- Level
- Drill or screwdriver
- Circular saw or hand saw
- Shovel or post hole digger
- Mixing container for concrete
- Paintbrush or roller (if painting)
Gathering all the necessary materials and tools before starting your DIY project will make the process much smoother and prevent any unnecessary delays.
Choosing the Right Location
Before diving into the construction process, it’s important to carefully choose the right location for your outdoor pull-up bar. Consider the following factors:
Considering safety:
Ensure you choose a location that provides enough space and does not have any hazards. Look out for low-hanging branches, electrical lines, or any other potential dangers that could interfere with your workouts.
Available space:
Measure the area where you plan to install the pull-up bar and ensure it is large enough to accommodate your movements during exercises. You don’t want to feel cramped or restricted while performing your workouts.
Clearance overhead:
Make sure there is sufficient clearance overhead for you to perform pull-ups without hitting your head on anything. It’s essential to have ample space above the bar to maintain a safe and comfortable workout environment.
By taking these factors into account, you can choose a location that is both safe and practical for your outdoor pull-up bar.

Designing and Planning
Once you have selected the perfect location, it’s time to move on to designing and planning your pull-up bar. Here are the crucial steps to consider:
Determining the type:
Decide on the type of pull-up bar you want to build. There are various styles, including wall-mounted, freestanding, or even ones that attach to existing structures. Choose one that suits your space and preferences.
Estimated budget:
Calculate an estimated budget for your project by researching the cost of the materials and tools required. This will help you stay on track financially and avoid any unexpected expenses.
Measuring and marking:
Using a tape measure, carefully measure and mark the specific dimensions for your pull-up bar. Ensure accurate measurements to guarantee a well-built and sturdy structure.
By taking the time to design and plan your DIY outdoor pull-up bar, you can ensure it perfectly meets your needs and efficiently utilizes the available space.
Preparing the Ground
Before you can start constructing the pull-up bar, you need to prepare the ground where it will be installed. These steps will ensure a solid foundation:
Clearing the area:
Remove any debris, plants, or obstacles from the designated spot. Clearing the area will provide a clean space for building and prevent any interference during the installation process.
Leveling the ground:
Use a shovel or a post hole digger to level the ground where the pull-up bar will be placed. It’s crucial to create a flat and even surface to ensure stability and proper alignment of the structure.
By preparing the ground adequately, you set the stage for a successful and long-lasting outdoor pull-up bar installation.

Constructing the Base
The base of your pull-up bar provides the foundation upon which the entire structure rests. Follow these steps to construct a solid base:
Digging holes:
Using a shovel or post hole digger, dig holes deep enough to accommodate the posts for your pull-up bar. The depth will depend on the height and stability you desire for your structure.
Setting concrete:
Mix the concrete according to the manufacturer’s instructions and pour it into the holes. Make sure the posts are securely placed in the concrete, and use a level to ensure they are perfectly vertical.
Installing posts:
Position the posts into the wet concrete and ensure they are straight and aligned correctly. Allow the concrete to cure fully before moving on to the next steps. This will ensure a strong and stable base for your pull-up bar.
By following these steps carefully, you can create a sturdy and reliable base for your DIY outdoor pull-up bar.
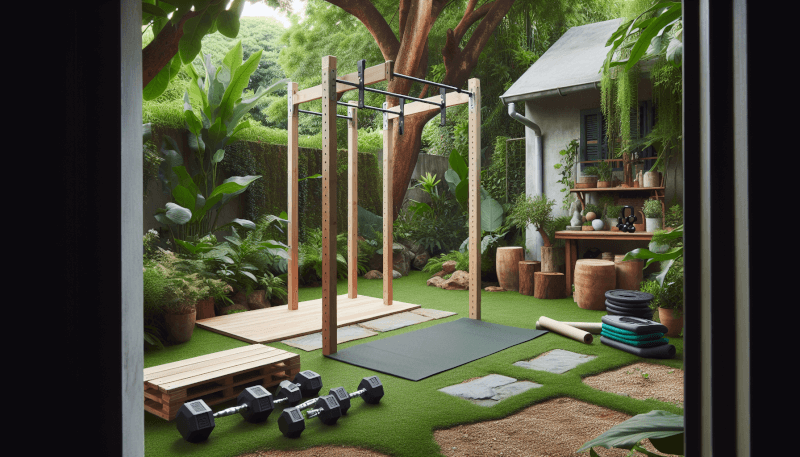
Building the Frame
The frame of your pull-up bar provides the structure and support for the bar itself. Follow these steps to build a robust frame:
Cutting the lumber:
Using a circular saw or a hand saw, cut the lumber to the desired dimensions for your frame. Ensure precise cuts to guarantee a well-fitted and stable frame.
Attaching the crossbar:
Securely attach the crossbar to the vertical posts using screws or bolts. The crossbar should be at a comfortable height for you to perform pull-ups without straining.
Securing the frame:
Double-check all connections and make sure the frame is securely fastened together. Test its stability by applying pressure and gently shaking the structure. If it feels wobbly, reinforce the connections until it is sturdy and secure.
By building a strong and secure frame, you will create a reliable foundation for your pull-up bar.

Adding the Pull-Up Bar
Now that the frame is complete, it’s time to add the pull-up bar itself. Follow these final steps:
Choosing the bar:
Select a galvanized steel pipe or bar that is suitable for pull-up exercises. Consider the diameter and length that will best fit your hands and accommodate various grip variations.
Attaching the bar:
Securely attach the pull-up bar to the crossbar of your frame using screws, bolts, or other appropriate fasteners. Ensure it is installed at a comfortable height and is level with the ground.
By following these steps, you will complete the construction of your DIY outdoor pull-up bar.
Finishing Touches
While not necessary, adding a few finishing touches can enhance the appearance and functionality of your pull-up bar. Consider the following options:
Sanding and painting:
Sand the wood surfaces of your pull-up bar frame to create a smooth finish. You can also consider painting or varnishing the wood to protect it from weathering and to add your personal touch.
Adding grips or padding:
Attach grips or padding to the pull-up bar to provide extra comfort and improve your grip during workouts. This can prevent blisters and make your exercise sessions more enjoyable.
By paying attention to the finishing touches, you can create a pull-up bar that not only functions well but also looks great in your outdoor space.

Safety Considerations
Ensuring the safety of your DIY outdoor pull-up bar should be a top priority. Here are some essential safety considerations:
Checking stability:
Regularly inspect the pull-up bar to ensure it remains stable and secure. Check for any loose fittings, bolts, or screws, and tighten them as necessary. Additionally, monitor the stability of the concrete base and address any signs of deterioration or shifting.
Maintaining and inspecting:
Regularly examine all components of the pull-up bar, including the frame, bar, and base. Look for any signs of wear, rust, or damage. Address any issues promptly, such as replacing worn-out grips or repainting faded wood, to maintain the safety and longevity of your pull-up bar.
By prioritizing safety and performing regular inspections, you can enjoy your DIY outdoor pull-up bar with peace of mind.
Enjoying Your DIY Outdoor Pull-Up Bar
Now that your DIY outdoor pull-up bar is complete, it’s time to reap the benefits and enjoy your personalized workout space. Here are some advantages of having your own pull-up bar:
Benefits of having one:
- Convenience: Having a pull-up bar in your backyard allows you to exercise whenever you want, without the need to travel to a gym or fitness center.
- Versatility: Pull-up bars offer a wide range of exercise options, allowing you to target various muscle groups and perform different workout routines.
- Cost-effective: Building your own pull-up bar can be more affordable than purchasing one, especially if you already have the necessary tools and materials.
Adding variations to your workout:
With a pull-up bar readily available, you can experiment with different grip positions, such as wide grip, narrow grip, or underhand grip, to target different muscle groups. Additionally, you can incorporate other exercises, such as hanging leg raises or chin-ups, to diversify your workout routine and keep it challenging.
As you master different exercises, you can gradually increase the intensity and difficulty level to continuously challenge yourself and achieve your fitness goals.
Building your own DIY outdoor pull-up bar is a rewarding project that provides you with a versatile and convenient way to stay fit and active. Embrace the process, follow the step-by-step instructions, and enjoy the benefits of having your own functional workout space at home. Happy building and happy exercising!

